Introduction
Tutorials
Getting familiar with GeoData Manager
Changing how GeoData Manager looks
Scenarios for using GeoData Manager
Data types and nodes
Help with data types and nodes
Getting familiar with GeoData Manager
Changing how GeoData Manager looks
Scenarios for using GeoData Manager
Help with data types and nodes
GeoData Manager has many settings that you can change to set up GeoData Manager to your liking. This section describes:
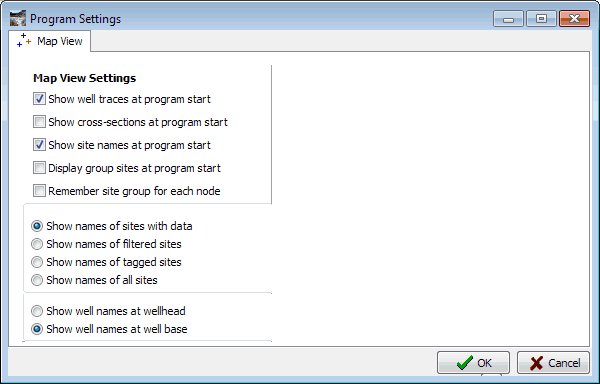
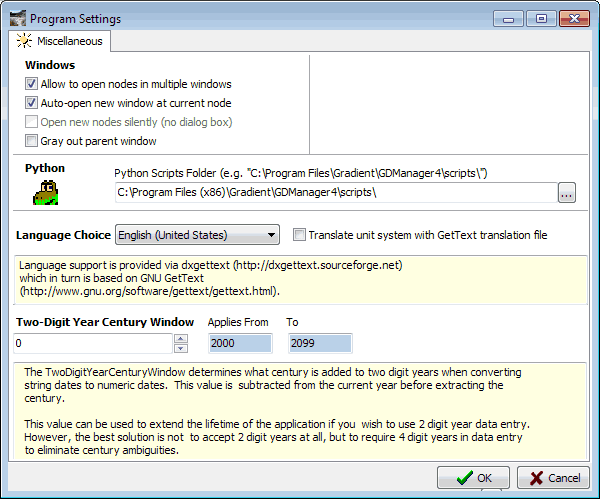
Using the Company, General, Graph, Map view and Miscellaneous settings windows to change general program preferences
How settings files are installed and upgraded
Working with the settings files manually
Managing the Python scripts
Setting Users and permissions
Setting Mapping parameters
Setting Field limits
Setting The primary coordinate system
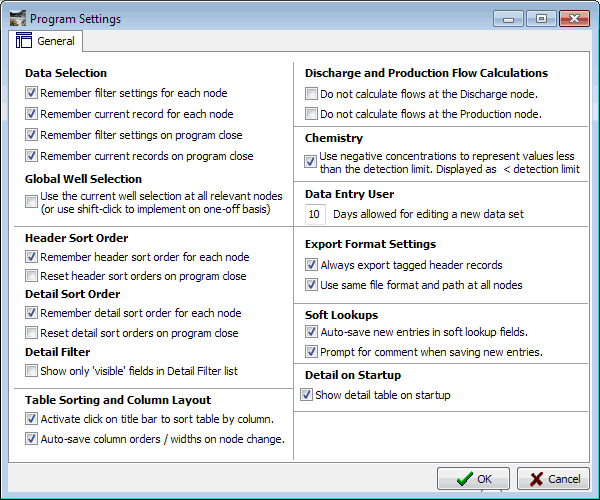
General program preferences are stored in the file preferences.ini and you can change some of these preferences directly in the Preferences window: click Tools in the menu bar, then click Preferences:
Make any changes and click OK. For more information about:
Company settings tab see herePython tab see hereData selection and Global well selection see here.Note You can work with the file preferences.ini directly if you want see below.
Each user has their own settings files:
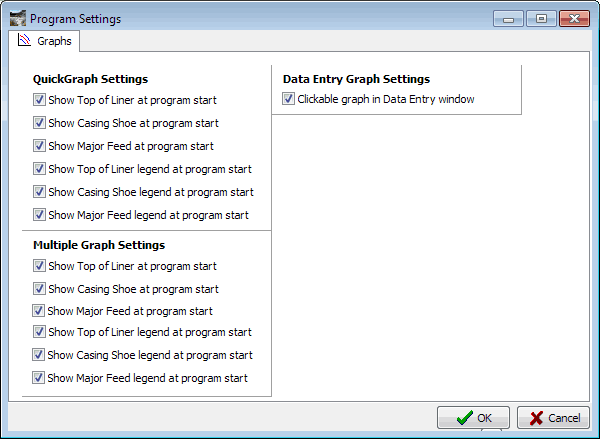
graphstyles.mdb: Quick Graph and Multiple Graph defaults.
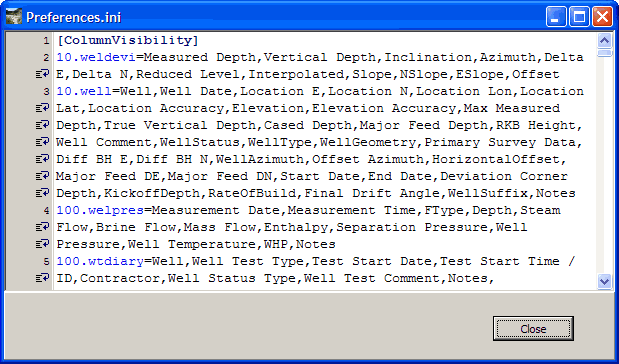
Preferences.ini: Program preferences from the settings windows](#pr_company), plus settings for column visibility, column widths, databases in the database manager window, export, import and more.
units.mdb: Has information about the default units and the units set currently in use. You can see and change this information in the unit preferences window.
In addition, GeoData Manager uses these files internally:
Control.mdb: Control.mdb has data about each GeoData Manager window that is open.
general.mdb: Contains the PTree data; the predefined lookup data (for example standard casing sizes for the Casings node).
TreeViewNodes.txt: A list of all nodes and if they are currently visible or not. GeoData Manager uses this as a shortcut to display the database tree nodes. If this is missing, then GeoData Manager will recreate it.
Note
You can change some of these settings explicitly, by changing the settings in the Preferences and Unit Preferences windows. However, GeoData Manager will change most of the settings automatically as you use GeoData Manager, for example it will automatically save any changes you make to column ordering and visibility.
If GeoData Manager is using one of the .mdb files then you will see in the settings folder a file with the same name, and extension .ldb. This is a lock file, to prevent other tasks from changing the .mdb file while GeoData Manager is using the file.
GeoData Manager stores a user's settings files in a settings folder. A typical path for this folder might be C:\Users(your user name)\AppData\Local\Gradient\GDMan, though the path name will be different for different versions of Windows.
Because that path depends on 'your user name', each user has a different, and private, settings folder. When GeoData Manager is first installed, each user will have the same preferences files. However, as each user works with GeoData Manager and changes preferences and defaults, their preferences files will diverge from other users.
To see the files in the settings folder, click Tools, then My settings, then Open settings folder.
You can manually recreate units.mdb in your settings folder:
Click Tools, then Refresh units from XML.
When you install GDM for the very first time (but don't run it) the installation puts information about settings in the GeoData Manager program folder (where it puts the GeoData Manager program). A typical path for this program folder might be C:\Program Files (x86)\Gradient\GDManager4, though the path name will be different for different versions of Windows. When a user runs GeoData Manager for the first time, it creates the user's settings folder and inserts the default settings files:
graphstyles.mdb: created from xml files in the GeoData Manager program folder
Preferences.ini: copied from preferences.ini in the GeoData Manager program folder
units.mdb: created from xml files in the GeoData Manager program folder
also Control.mdb, general.mdb and TreeViewNodes.txt
When you install an upgraded version of GeoData Manager, the installation might put upgraded information about unit preferences in the GeoData Manager program folder. For example the xml files might have a new unit type. Note that an upgrade to GeoData Manager will not upgrade:
When a user runs an upgraded GeoData Manager for the first time, GeoData Manager will check to see if there is a new version of the units xml file in that folder and if there is, it will upgrade each user's existing units.mdb, leaving existing unit preferences as they are. For example if the unit xml files have a new unit type then GeoData Manager will add this unit type to each user's units.mdb.
There is a special case when you upgrade GeoData Manager and have linked to different Python scripts see here.
If a user's settings file in their settings folder gets deleted or corrupted, GeoData Manager will automatically reload that file. The user's settings will change back to GeoData Manager's defaults. If you have earlier loaded the file from company settings you must reload it manually.
You can share settings files with other users; the main use of this is to set up GeoData Manager so it has the same look for each user in the company.
A power user or administrator should use GeoData Manager until it is set up the way they want it. Then:
Click Settings, then Company settings. Click the Upload tab.
Browse to find a company folder for GeoData Manager to upload the company settings. The folder should be accessable by to all GeoData Manager users.
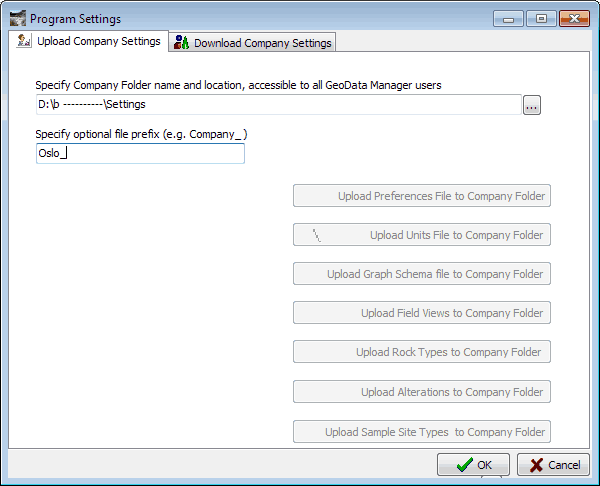
Click one or more of the grey Upload buttons in the window to save those settings to the company folder.
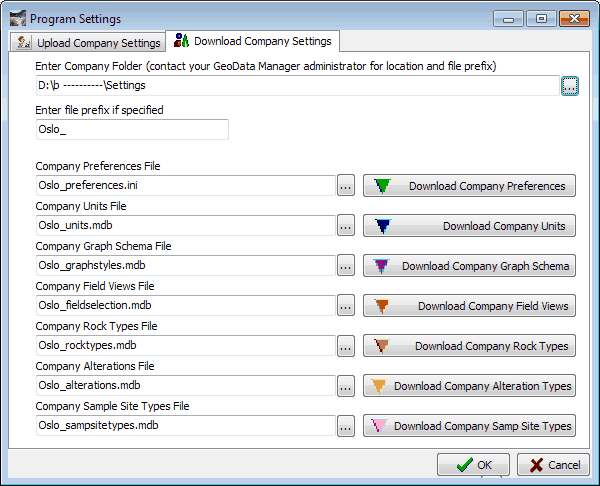
On each users computer, in GeoData Manager:
Click Settings, then Company settings. Click the Download tab.
Browse to find the company folder where you uploaded the company settings above.
Click one or more of the grey Download buttons in the window to get those settings to the company folder.
Note As each user uses GeoData Manager the settings in the settings files will inevitably drift apart slightly. The look and feel will remain the same.
Click Tools, then click My settings. Then:
Open Settings Folder Open a Windows Explorer folder containing the user's settings files. This tells you where the files are on your PC.
View Preferences.ini File This also reorders preferences.ini into alphabetic order by heading. For example:
Refresh Preferences.ini File Reorder preferences.ini into alphabetic order by heading.
Reload Preferences.ini File Loads the settings in the current preferences.ini file into GeoData Manager, replacing the current settings in GeoData Manager. Use this if you change preferences.ini from outside GeoData Manager (for example by replacing the file with another one) while GeoData Manager is running.
You might use preferences.ini directly:
To back up preferences.ini using Windows Explorer.
To change it manually, see below.
We don't recommend doing this; it is easier and more reliable to just change the setting by using GeoData Manager. But, if you want to:
Use Refresh Preferences.ini File to reorder it into alphabetic order by heading, so it is more comprehensible.
Use Open Settings Folder to find which Windows folder containing Preferences.ini.
Open Preferences.ini with a text editor, make changes to the settings, save it.
Use Reload Preferences.ini File to load the new settings into GeoData Manager.
Python is a programming language, and GeoData Manager's Python scripts are small programs used by GeoData Manager. Most GeoData Manager users can ignore this section.
GeoData Manager automatically loads the Python scripts each time you start GeoData Manager. In addition, you can manually reload the Python scripts while GeoData Manager is running if you have occasion to change a script; this is useful during debugging. To reload the scripts:
Tools, then Reload Python scripts.Tools, then Reload Python scripts.By default, GeoData Manager installs the Python scripts into the GeoData Manager program folder and then loads the scripts from there.
If you want to work with the scripts then it is often better to put the scripts into your own scripts folder, because using files in the folder where the GeoData Manager program is stored might require IT permission. There are two aspects to this:
Getting hold of the scripts
Copy the existing scripts into a new scripts folder on the server that is visible to all users, then make your changes. Note that when GeoData Manager installs the scripts into the GeoData Manager program folder, it also copies them to each user's settings folder; it might be easier for you to copy them from there.
Loading the new scripts into GeoData Manager
For each user that will use the new scripts:
Click Tools, then Preferences and click the Python tab.
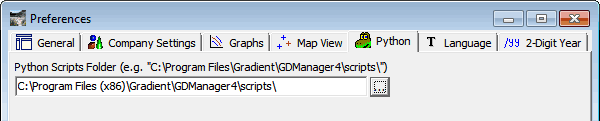
Browse to your scripts folder and select it. Note that if you set your scripts folder to the user's settings folder, the path is displayed as:
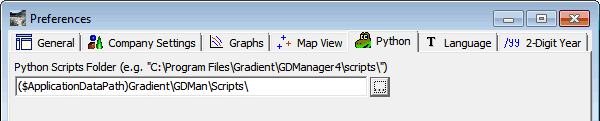
Click OK in the preferences window. The new scripts automatically load, and GeoData Manager will continue to load these new scripts in the future.
When you upgrade to a new version of GeoData Manager, it might have new or changed Python scripts:
There are three separate sets of users and permissions in GeoData Manager:
GeoData Manager's own user names and permissions; these are described in this section.
Windows own user names and permissions, to allow users to log into and out of Windows. You should have already set these up in Windows: Control panel: User Accounts. Ensure each GeoData Manager user's name that you set up is the same as their Windows user name.
The stand-alone Windows database manager program Microsoft SQL Server has its own permissions:
All GeoData Manager users must be granted SQL Server read/write permissions and private table create/destroy permissions. An undefined user may cause the program to crash.
GeoData Manager Administrators must have SQL Server permissions to create tables accessible by other users in order to upgrade a GeoData Manager database. The recommended way to implement this is to create a SQL Server db_owner role for the GeoData Manager databases, and to assign GeoData Manager Administrators to this role. This allows Administrators to update GeoData Manager databases as required, without causing problems for other users.
Normally your IT department sets up SQL Server databases for GeoData Manager. Ensure that the IT department are aware of the special requirements for GeoData Manager users, and Administrators in particular.
Access databases By default, all users have full read/write permissions (and you can skip this section on managing users and permissions). If you want users to have different permissions then:
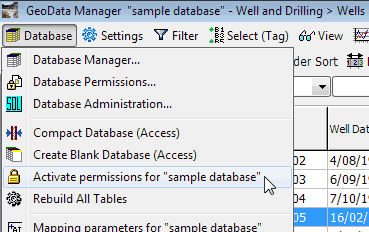
In GeoData Manager's home window, click Databases, then click Activate premissions for ... database:
Set users and permissions, as described below.
SQL Server databases you can set users and permissions, as described below.
| Permission Level | Symbol | Allows the user to edit |
|---|---|---|
| 0-Read only |  |
Nothing |
| 1-User |  |
Group definitions and column orders at all nodes; data sets at the specified Subsystem Group nodes; nothing at other nodes (there the symbol is |
| 2-Administrator |  |
Everything |
| 3-Data entry |  |
Enter new data, and edit recent data (entered within a specified time; the default is 10 days) |
| 4-Power user | |
Everything, except for setting permissions and for database upgrades |
| Undefined |  |
Nothing |
Note:
Most users will be either User or Power user.
All users can look at all parts of GeoData Manager.
The GeoData Manager displays the user's symbol in the database tree to show what the user can edit.
Open GeoData Manager's Database Manager and select the database to work with.
In GeoData Manager's main window, click Database in the menu bar, then click Database Permissions ...:
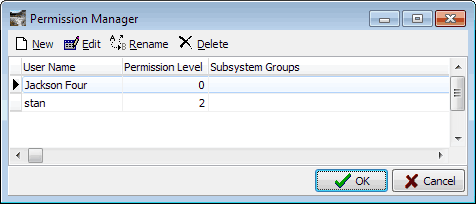
There are four commands:
| Command | |
|---|---|
| New | Create a new user |
| Edit | Change the selected user's permissions, but not the user's name |
| Rename | Change the selected user's name |
| Delete | Delete the selected user |
The User Name here must match the user's Windows user name. You can also right-click in the window to bring up a menu of these commands.
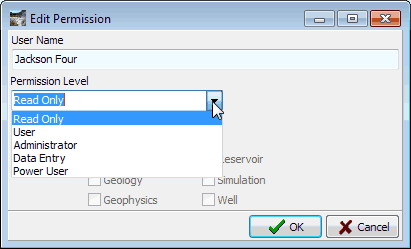
| Field | Note |
|---|---|
| User Name | Use Rename to change the user name |
| Permission Level | Choose from the dropdown list |
| User Subsystem Groups | For some Permission Levels: select the parts of GeoData Manager that the user can use |
When you create a new SQL server database or upgrade one as part of upgrading GeoData Manager, you must have Admin permissions plus either SQL Server dbo rights (eg IT staff) or you and other GeoData Manager users must all be members of a db_owner role for this database.
We recommend that at least one senior GeoData Manager user (probably your chief reservoir engineer) should be granted GeoData Manager Admin permissions and also be given db_owner rights for all the GDM SQL Server databases. This user should create new SQL server databases and upgrade SQL server databases when GeoData Manager is upgraded.
The mapping parameters are specific to the location of the field and specify the mapping conversion from location (E and N) and latitude/longitude at the field. Do not change these unless the local map grid changes.
GeoData Manager stores coordinates in two systems:
in Projected: map coordinates: Location E, Location N, generally in metres.
and Geographic: latitude and longitude on the earth, in decimal degrees.
Most people use and are familiar with Projected (map) coordinates. We recommended using Projected primary coordinates and entering map coordinates. GeoData Manager will calculate WGS84 latitudes and longitudes.
Note
The system in use at any time is called the primary coordinate system. GeoData Manager uses the mapping parameters to convert the location in the primary location system to the location in the other system, and stores each location in both systems.
To change the coordinate system: Click Tools in the menu bar, then Primary coordinates. Then click Projected or Geographic.
Projected: A GPS will usually measure latitude and longitude but can be set up to give map coordinates.
Geographic: requires latitude and longitude in decimal degrees.
To view and change the mapping parameters:
You must have Administrator permission.
Click Tools in the menu bar, then click Mapping:
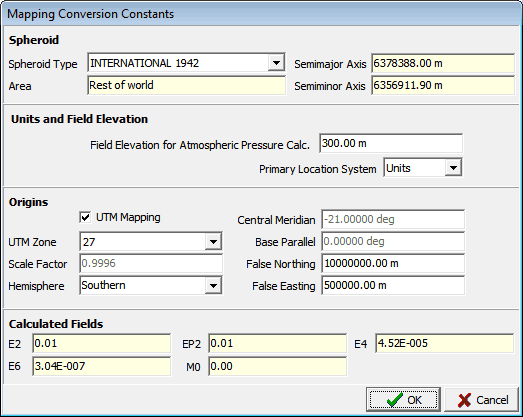
| Field | Note |
|---|---|
| Spheroid type | When is a lookup field which automatically fills the Semimajor axis and Semiminor axis |
| Field Elevation for Atmospheric Pressure Calculation | Used for gauge-absolute pressure conversions in GeoData Manager if the elevation of a measurement location is not defined |
| UTM Zone | A lookup which automatically fills Central Meridian (zero longitude of map) |
| Central Meridian | Is separately editable for mappings that do not use the standard UTM Zones; if you edit Central Meridian UTM zone will be set to 0 to indicate a custom value |
| Base Parallel | Is the zero latitude of the map - this is usually 0 deg (equator) in the Northern Hemisphere and -90 deg in the Southern Hemisphere |
| False Northing and False Easting | Origin offsets to avoid negative northings and eastings on maps |
| Scale Factor | Is at Central Meridian; is usually 0.9996 but sometimes taken as 1.0 |
| E2,E4,E6,EP2, M0 | Are filled in when you enter the other fields |
Note: Conversions are for Transverse Mercator projections and possibly Conical Lambert when there is no offset from WGS84. In these cases, the conversion between projected and geographic will match local maps.
After you create a new database, you are invited to set the mapping parameters for the database. If you don't do this, and click Cancel then:
A warning is displayed.
You will be returned to the last fully specified GeoData Manager database (possibly the sample database). The next time you try and open a database with unspecified mapping parameters you are invited to set the mapping parameters again.
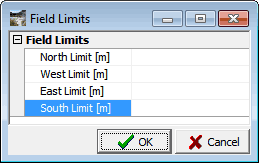
The field limits are the extent of the geothermal field in in the current database. The units are the units of the primary coordinate system.
Click Tools in the menu bar, then Field limits: